? Do small DIY projects feel intimidating even before you begin?
You will gain a clear, practical framework to choose, start, and finish small DIY projects without the overwhelm. This article gives one main technique you can apply right away, shows a realistic example for a small space, explains common beginner mistakes and fixes, and suggests what to try next.
Practical DIY and handmade project ideas
Core Explanation: One Main Concept — Reduce Scope, Increase Confidence
The central idea is simple: shrink the project so that decision-making, materials, time, and cleanup are all intentionally minimal. When you reduce scope in a way that preserves the meaningful parts of making — the creative choice, the tactile process, the visible outcome — you get wins quickly. Those wins build confidence, which compounds into a habit of making more, trying slightly harder things, and enjoying the process instead of fearing failure.
Shrinking scope means applying explicit constraints to three categories: time, materials, and technique. Time constraints are short windows you can reliably commit to (30–90 minutes). Material constraints mean using a handful of items you either already have or can buy cheaply. Technique constraints mean choosing a single or familiar method to learn or repeat (sewing a straight seam, folding and gluing paper, staining wood with a rag). These constraints act like guardrails: they reduce the number of choices you have to make, which lowers anxiety and decision fatigue.
Practical usage example — a realistic project for small spaces
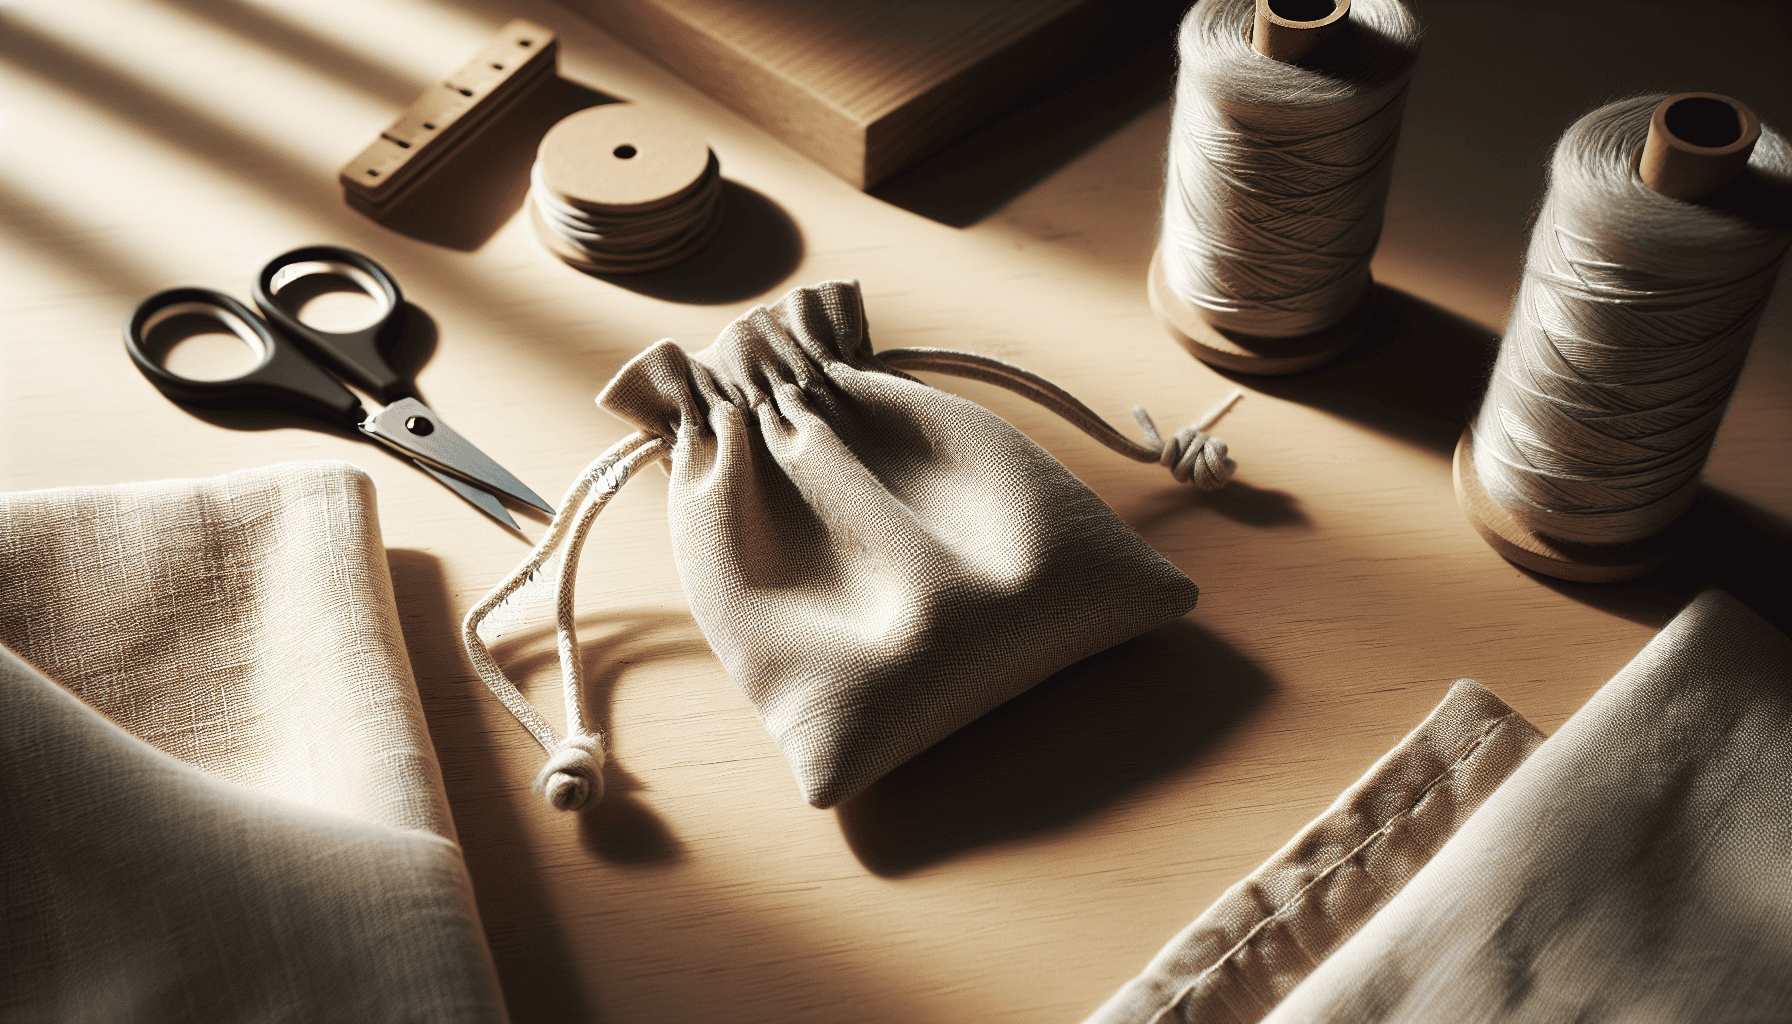
- Project: A simple fabric drawstring bag for storing chargers and small items.
- Why it fits the method: It uses one technique (straight sewing), a short time window (60–90 minutes), and minimal materials (a 12 x 18 in piece of cotton, 1/4 yd of ribbon or cording, basic thread). You can complete it on a small tabletop with minimal tools: a basic sewing machine or needle and thread, scissors, pins.
- What you’ll learn: basic measuring, cutting a straight edge, sewing a seam, and finishing a casing for a drawstring. These skills are transferable to other small sewing projects, like a simple pillow cover or a fabric pouch.
Breaking the main concept into decision rules
- Rule 1 — Limit time up front. Decide a realistic session length and stick to it. Tell yourself the project must be completable in that time.
- Rule 2 — Limit materials to three to five items. If the idea needs more, either simplify or split the project into multiple sessions.
- Rule 3 — Choose one clear technique to focus on. Use it in a couple of places in the project so you gain repeated practice.
- Rule 4 — Accept an intentionally modest finish standard. Aim for useful and tidy, not magazine-perfect.
These rules make it easier to pick a project you’ll complete, and they make each decision you face straightforward. Instead of asking dozens of “what if” questions, you answer just a few: How long will this take? Which three materials will I use? Which technique will I practice? Those narrow questions are less intimidating.
How To Start Small DIY Projects Without Feeling Overwhelmed
Practical Starter Plan: Step-by-Step Approach for the First Project
A simple, repeatable plan removes friction at the start and guides you through the decisions that often stop people before they begin. Each step below keeps scope small and choices minimal so you can get to making.
Step 1 — Pick a project with a clear, single-purpose goal
Choose something you will actually use within a week. A snack bowl coaster set, a small macramé keychain, or the drawstring pouch described above are good examples. If you know the outcome will be used, you’ll be more motivated to finish.
Why this matters: Projects that serve a purpose reduce the pressure to “make art.” They’re practical, and usefulness is forgiving; small mistakes aren’t fatal.
Step 2 — Timebox your session
Decide how long you can reasonably commit today: 30, 60, or 90 minutes. Use a kitchen timer or your phone and follow it.
Why this matters: Timeboxing prevents perfectionism from expanding tasks and keeps you accountable. Short sessions lower the activation energy to start.
Step 3 — Choose materials intentionally
Pick only the basics needed to finish a single item. For example, for the drawstring bag: one fabric piece, thread, a 1/4 inch cord, and a safety pin. Avoid buying specialty tools for a first attempt. Use what you have, borrow, or purchase low-cost substitutes.
Why this matters: Low material cost reduces the fear of wasting supplies if the first attempt isn’t perfect. Using common materials also forces creative problem solving.
Step 4 — Lay out a tiny workspace and simple cleanup plan
Clear a tabletop or a corner of a counter. Put a small container for scraps and a trash bag nearby. Plan to spend five minutes cleaning up after you finish.
Why this matters: Knowing cleanup is short removes the mental barrier of “I won’t have time to tidy afterward.” It also ensures you can reuse the space quickly, making it easier to start again.
Step 5 — Use a single, reliable method and accept small imperfections
Follow one technique for the whole project and keep finishing standards practical. For the bag, it’s straight seams and an even casing. If a seam is slightly crooked, it still functions.
Why this matters: Focusing on one method creates repetition that builds skill quickly. Tolerating visible imperfections prevents paralysis and keeps you making.
Step 6 — Reflect briefly and store what you learned
After finishing, spend three to five minutes noting what worked, what you’d change next time, and where you stored leftover materials.
Why this matters: A quick reflection turns experience into learning, which accelerates your ability to plan future, slightly bigger projects.
Table: Examples of 3 small projects and how they map to time, tools, cost, space, and skill
| Project | Time | Tools | Estimated cost | Space needed | Skill focus |
|---|---|---|---|---|---|
| Paper garland (cut, fold, glue) | 30–45 min | Scissors, glue stick, ruler | $0–$5 | Small tabletop | Cutting, simple folding, composition |
| Drawstring bag (12 x 18 in) | 60–90 min | Scissors, needle/machine, pins | $3–$12 | Small table with lamp | Straight sewing, measuring |
| Recycled jar planter (paint or wrap) | 45–60 min | Paint brush, acrylic paint or twine | $2–$8 | Countertop or balcony ledge | Painting/adhesion, finishing |
This table helps you compare projects quickly so you can pick one that fits your current constraints.
Decision aids for picking your first project
- If you have 30 minutes: choose paper or no-sew projects that require cutting and glue.
- If you have 60–90 minutes: pick one-seam sewing projects, small wood or painting tasks, or a simple recycled-material creation.
- If you have limited storage: prefer flexible, stackable, or consumable materials (fabric scraps, paper, twine).
These small decision aids keep the barrier to entry minimal and help you choose a project that aligns with your day-to-day life.
Common Mistakes and Fixes
When beginners start small DIY projects, a few predictable issues come up repeatedly. Understanding them and applying the fixes below will save you time and reduce frustration. Treat these as normal parts of learning.
Mistake 1 — Choosing an overcomplicated project What happens: You pick something that sounds fun but requires many materials, unfamiliar tools, or advanced techniques. Momentum stalls when everything feels new at once. Fix: Break the project into modular steps and choose one module for your first session. If you wanted a painted and stitched textile wall hanging, for example, start with just the painting step or just the basic stitching. Use the Reduce Scope rules: limit time, materials, technique. Completing a module still gives a result and reduces the intimidating breadth of the original project.
Mistake 2 — Starting without a very small plan What happens: You start with only an idea in your head and get stuck deciding sizes, colors, or techniques while the timer runs out. Fix: Prepare a one-paragraph plan before you start: the purpose of the item, the exact dimensions or size, three materials, and the technique you’ll use. This short plan prevents decision drift. Use a quick checklist: what you’ll make, how long it should take, what materials you need, and the finish standard (functional/tidy).
Mistake 3 — Buying lots of specialty tools first What happens: You spend money on a fancy tool because you believe it will make the project easier or quicker, and then you don’t start because there’s another learning curve. Fix: Start with basic alternatives. Borrow a tool, use a manual technique, or rent time on equipment if appropriate. Only buy a specialized tool when you’ve made the project a few times and know the tool will be used again and often.
Mistake 4 — Letting perfectionism control finishing standards What happens: You keep undoing work, re-cutting, or redoing steps to achieve a flawless result, until you run out of time or motivation. Fix: Set a realistic finish standard before you begin: “It must be usable and neat enough to gift to a friend who likes handmade items.” Use timeboxes; when the timer goes off, stop and accept what you’ve made. Remember that functionality matters far more than perfection in small DIY projects.
Mistake 5 — Not planning for cleanup and storage What happens: You end up with a messy table and scattered supplies that make it harder to start the next project. Fix: Allocate the last five to ten minutes of your session to cleanup. Store leftover materials in a labeled zip bag or small box so they’re ready for the next use. A tiny, labeled storage habit makes future projects less stressful.
Mistake 6 — Choosing colors or materials that don’t match your style or space What happens: You finish a project that you don’t like or don’t use because it clashes with your home aesthetic. Fix: Before buying or using materials, pick two anchor colors or textures you already have in your home. Use those anchors as a constraint. Small visual decisions are easier with boundaries; yellow and natural linen can guide your choices for several small projects.
Mistake 7 — Starting when you’re mentally exhausted What happens: You attempt creative work at the end of a long day and feel discouraged by slow progress. Fix: Schedule short creative sessions when you have moderate energy — for many people, this is a morning hour or an early evening slot. If that’s impossible, scale the task down further so it fits low-energy moments (tracing and cutting patterns instead of sewing).
Mistake 8 — Comparing early work to polished images online What happens: You see curated photos of finished projects and assume your first attempt should match, which kills motivation. Fix: Remember that online projects are typically staged and often the result of many iterations. Focus on what you can learn from your first attempt rather than how it photographs. Keep a “practice” box where early tries live; they’re useful references for what you’ll do differently next time.
Mistake 9 — Not testing materials or techniques on a scrap What happens: You use an expensive material or irreversible step and find it doesn’t behave the way you expected. Fix: Always test paint, glue, or seam allowances on a scrap first. A short test can reveal surprising issues (fabric fraying, absorbency, glue showing through), and testing saves time and money.
Mistake 10 — Trying to master too many new skills at once What happens: You overload yourself with learning a new tool, technique, and material all within a single project. Fix: Learn incrementally. If your project requires a new technique and a new tool, practice the technique with a familiar tool first, or vice versa. Focused repetition accelerates competence.
These fixes are practical and small. They’re not about removing challenge entirely; they’re about making learning safe and steady so you can keep making.
Practical Examples of Scaling Small Projects Over Time
Once you’ve completed a few small projects using the reduce-scope method, you’ll want to gradually increase complexity in ways that feel natural and sustainable.
Example 1: From drawstring bag to zippered pouch
- Small step up: Add a simple zipper insertion on a second pouch. Learn zipper terminology and apply one new technique while keeping the rest of the project familiar.
- Why it works: You’re only introducing one new element. The rest of the sequence — measuring, cutting, sewing seams — stays the same so the learning curve is manageable.
Example 2: From paper garland to simple paper folding mobile
- Small step up: Use the same cutting tools and glue supply, but learn two variations of folding and a basic hanging technique.
- Why it works: Paper projects are low-cost, so experimenting is low-stakes. Repetition builds hand skill fast.
Example 3: From recycled jar planter to painted herb pot set
- Small step up: Try basic color mixing and simple brush techniques on three small jars instead of one.
- Why it works: You learn to control paint over multiple small surfaces and practice consistent finishes.
These scaled steps follow a pattern: keep two-thirds of the project familiar and swap in one new skill. That ratio keeps anxiety low and progress steady.
Next Steps: What You Might Try After This Project
Once you complete one or two small projects using the approach above, the next steps are about building habits and sensible skill growth. Here are options you can pick depending on what you enjoyed.
If you enjoyed quick, visual satisfaction:
- Try a small series of color- and texture-focused projects: coasters, bookmarks, or simple wall hangings. These reinforce composition and finishing skills.
If you liked working with fabric:
- Practice one new seam or finish each time: lining a pouch, inserting a zipper, or making a boxed corner. Keep projects small so each technique gets repeated.
If you preferred working with recycled materials:
- Build a collection of small useful items from found objects: cord organizers, planters, or wrapped vases. Aim for three similar items to build repetition.
If you want to build a slow daily creative habit:
- Commit to a 15–30 minute “mini-make” session three times a week. Use a small project list that cycles through techniques and materials. The key is consistency rather than scale.
Skills worth focusing on next
- Measuring and marking with confidence. Little accuracy gains save time and reduce rework.
- A single finishing technique per project (hemming, edge painting, sealing) so your work looks tidy without extra fuss.
- Simple photography and documentation. Photographing your projects briefly helps you notice progress and inspires future ideas.
Variation ideas to keep things fresh
- Swap materials but keep the technique: sew pouches using oilcloth or canvas instead of cotton to learn about material handling.
- Swap technique but keep the materials: use fabric you love and try simple knit or crochet accents instead of sewn seams.
- Make sets rather than single items. Making three similar items in one session builds repetition and shows how small adjustments change the outcome.
How to keep motivation steady
- Keep a small, visible shelf or corner where recent projects live. Seeing your work in the space you use reinforces the value of making.
- Keep an honest progress notebook: two lines per project about what worked and what you’d tweak next time.
- Share a project with a friend or gift it. The external appreciation is encouraging, and you’ll be less likely to overwork it.
A brief plan for your next three projects
- Project A (week 1): Repeat the first project but aim to finish it faster or neater. Note one thing to improve.
- Project B (week 2): Try a small variation — change the material or a color palette — and repeat the same technique.
- Project C (week 3): Introduce one new, low-cost technique (a simple zipper, a painted finish, a button closure). Keep the rest of the project the same.
These steps help you grow without suddenly increasing the friction that caused overwhelm in the first place.
Final Thoughts
Small, intentional constraints are not limits — they’re tools that make creativity sustainable. By choosing a narrow scope, timeboxing work, and practicing one technique at a time, you change the project from an intimidating list of unknowns into a short sequence of doable steps. You’ll finish more, learn more, and enjoy the process more.
If you’re ready, pick one small project from the table above, set a timer for 60 minutes, and follow the Practical Starter Plan. Treat the result as a learning piece rather than a final artifact. Over time, those small, completed projects will add up into a rich personal practice that fits your life, space, and tools.
You don’t need to be perfect to make something useful and pleasing. Start small, keep it simple, and let the satisfaction of completion carry you forward.